MICURA
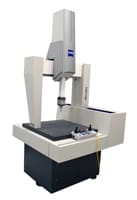
This high precision, compact, bridge-type CMM features precision scanning technology with the VAST XT gold active scanning sensor. Accuracy is now 0.7um +L/400 and best in class scanning accuracy of 0.9um / 40 seconds. The MICURA system is excellent for measurements of small and intricate parts often required in the optical, electronic, medical, aerospace and telecommunication industries.
As devices from the medical and electronic manufacturers become smaller so do the components that make them operate optimally. This shift in production is highly dependent on the right quality inspection equipment. The MICURA offers the accuracy to measure delicate parts such as optics and disk drive components while maintaining efficiency.

Key Features
A measurement volume of 500 x 500 x 500 mm handles a wide variety of small parts, a balanced range in all three axes for a machine in this size category.
VAST XT or VAST XTR scanning sensors that offer sub-micron accuracy with high-speed scanning of up to 200 points per second for form and length measurements, curve and freeform measurements, and reverse engineering.
Optional navigator technology increases measuring performance and productivity substantially.
Stiff monolithic bridge design includes ceramic technology for high stability against temperature changes and all dynamic influences.
Standard workpiece temperature sensor and temperature compensation for increased measuring performance and productivity.
CAA (Computer Aided Accuracy) ensures computer-aided error correction of the dynamic deformations of the machine technology.
Machine Technology
High Resolution Zerodur™ scales
Ceramic Core Beam for stiffer monolithic bridge
Rear mount controller to reduce foot print.
The granite machine table for a sturdy construction of this measuring machine.
4-side air bearings from ZEISS ensure more stability and measuring precision.
The controller, software, sensors and additional components are ZEISS products and are optimally matched to each other.
The computer-independent standard control panel permits manual control via the joystick at a measuring location away from the computer. Speed during CNC operation is controlled via the overdrive knob.
MICURA’s ergonomic apron surrounds the granite plate, providing room outside of the measuring volume for the panel, tools, and accessories.
ZEISS CALYPSO Software
CALYPSO is based on the principle of visual metrology: measure what you see – without extensive programming or complicated code and text input. All part features from a drawing or a CAD model are stored as icons. Select the icons you need and your measurement plan is finished. CALYPSO automatically calculates the ideal measuring run and travel paths.
ZEISS Video

